Thursday, January 19, 2012

Create an Heirloom...A Chinese Antique


While shopping in San Francisco just before Christmas
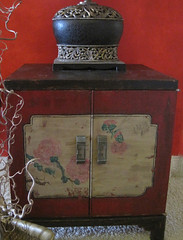
we saw a lovely antique Chinese cabinet and since every room could use a little "Chinoiserie" I decided to tackle this project


I took photos and
thought I might try to make my own
"Chinese Antique"
 Last week my husband reminded me of an old cabinet we had in the garage and said it might be something to make into our "heirloom"
I immediately began stripping the chipping paint off the 
old chest.

and ended up with this:

I painted the body with a very small brush and acrylic paints using raw umber, red, black and burnt umber mixed with water.  I taped off a section for the inset and painted it


When I pulled the tape off some of the paint came with it and
"voilĂ " my prefect method for distressing


After painting the insert I added some Chinese peonies
and black trim.  I also distressed the top of the chest
and the sides for authenticity and
I rubbed some bee's wax from this year's honey harvest onto the chest and then buffed it for a little glow.


This project was quite easy and didn't take much time at all!
xox
Nancy

Monday, February 28, 2011

Aotea (Great Barrier Island) New Zealand

AOTEAROA

This is Maori for New Zealand or (Land of the Long White Cloud)

AOTEA

This is Maori for Great Barrier Island  (or Island of the White Cloud) which is off the coast of Auckland

Awana Bay

A most beautiful bay on Great Barrier Island.  We are fortunate to have a 
summer home here. Here is a view from across the bay. Our home is just to the right of the rock peak in this photo about 1/3 of the way down, just left of a group of other homes.  We cannot see another home from here!


Our thoughts are with all of the people who suffered in the recent 
earthquake in Christchurch, South Island and wish them strength as they rebuild their lives.

xox

Nancy

Tuesday, February 15, 2011


Maori Basket Weaving

Handmade Flax Laundry Basket

…while in Rome…!!!!  While on our annual vacation to New Zealand (my husband is a Kiwi, after all!) we saw a nice basket and decided to try our hand at basket weaving.  We viewed some Maori (indingenious people of NZ) techniques at the New Zealand National Library website and away we went!  Michael couldn’t wait and made a small basket mostly by himself for our kumara (New Zealand potatoes) and garlic and such.  It turned out pretty well, so yesterday we harvested some native flax from the driveway to make a laundry basket.


This is a native flax plant in our driveway


Material used:
20 flax leaves
Scissors for splitting the leaves
Clothespins

We started by making a base of 20 leaves that crisscrossed

Then we made four corners

Corners as seen from the top

Corner as seen from outside


All that’s left to do is weave the sides,


 finish the top and make braided handles!

This basket will dry to a nice tan color.  We learned a lot and can’t wait to try some other patterns and sizes.
xox
Nancy


Monday, February 14, 2011

Happy Valentine's Day


Happy Valentine's Day

...from our little hideaway in New Zealand
(where it's full on summer!)

View of Awana beach  (Great Barrier Island,  New Zealand) from our deck.

xox
Nancy

Monday, January 17, 2011

The Art of Gwynne Reid

It's an absolutely beautiful morning here in California. It's one of those days where it could be spring, it could be fall but it's the dead of winter.  I will enjoy it while it lasts!


My husband's family is very artistic.  Today I will introduce you to his 
daughter, Gwynne.  She is a very talented artist and her
artwork adorns our home.

  
We recently framed two of Gwynne's newest pieces that go well in our "French" style living
room.  I love Paris but don't normally care for Eiffel Tower pictures, statues or paintings but this is an exception.  It's just so whimsical I fell in love with it.


Gwynne brought this painting over while we were having a party.  A bidding war ensued and I won!  I also love the French style whimsy of this painting.


Gwynne was quite young when she painted this.  It's perfect in our dining room.


What a fun "chess board."  We also have an abstract black and white checker board of hers.


This sunflower is my drawing.  I did it about 15 years ago when I sketched non-stop for about 6 months.  I really would like to find time to draw again and perhaps learn to paint, too.

xox
Nancy

Sunday, January 2, 2011

Pleated Pouch Presents

I found a great tutorial on pleated pouches at Skip to my Lou and decided to make a few small gifts.

I found the tutorial very good and learned about some of the pitfalls in making these.
I found that a 6" zipper worked better than the suggested 7".  It's also very important to line
up the front part of the pouch with the backside while installing the zipper.
This isn't very apparent at first but after my seam ripper got a workout I learned!
Ladybug Clutch
A cute ladybug button adorns this pouch.  My mother loved hers!

Elegant Clutch Tutorial
An elegant black and white one for my dear friend, Ady (made one of these for myself, too!)
  
Zippered Pouch.  Cat fabric.
My friend, neighbor, cat lover and cat sitter, Ollie got this one topped in beige.


Pleated Pouch Tutorial Post
My friend Phyllis (also a cat lover) go this one in pink.
They are useful for so many things that clutter up a purse.  A lipstick, jewelry, gum, pen, receipts.


two pink pleated pouches
 Two 'pretty in pink' ones for my daughter's darling nieces, Rain and Ayla.

Pleated Pouch with horse fabric and Pony Button Embellishment
   My niece, Ali loves horses.  Hope she likes the little pony button!


Elegant Burlap Bag in Black
Black Burlap Bag Tutorial.  Burlap Purse, learn how to make
And for my daughter's new mother-in-law a burlap bag.

I  MUST make one of these for ME!  I'm getting better at the burlap bag and have
found that iron on interfacing is a must for the body.  I've also learned how to feed interfacing into the straps after I've made and turned them making this bag much sturdier and easier to make.

I just made another burlap bag...white with yellow print lining.  It's shaped just like the black bag above.  Tutorial coming!

xox
 Nancy


Tuesday, November 9, 2010

Burlap Bag and a Thank You!

By now you know that I have a thing for burlap.  Well, I've done it again, gone and made another burlap bag. Fashioned after the original by I.Gant this bag is a "thank you" for all of the hard work Mary Reed has done preparing for my husband's retirement party. 

 I did a tutorial on a chocolate brown bag a few months ago and used the same basic pattern for this bag but changed it up a bit.  It's wider and shorter and has a large button instead of a shabby rose and I added a ring to dress up one of the straps.  Do you like this one better?  Here is the first one:

Burlap Bag with Shabby Rose Tutorial

Chocolate Brown Burlap Purse

I have been using this chocolate brown bag everyday since I made it and just love it.  Recently I added interfacing to the straps and an inside pocket for my iPhone.  For Mary's bag I made the straps a bit wider and learned how to install a magnetic snap.  That bag needed one because of the wider top opening.  I also rounded the corners a bit so they weren't so "dog-eared."  (see my tutorial for how to do this on a pillow here).  It's a bit different for a bag.  Perhaps I'll do a tutorial on this one, too.


And here is the finished bag. 


Do you like it?

Mary Reed...I can't thank you enough for all of the hours and hours you have spend ensuring that Michael's retirement party is a great success!  I hope you like your bag.


xox
Nancy


Related Posts with Thumbnails