
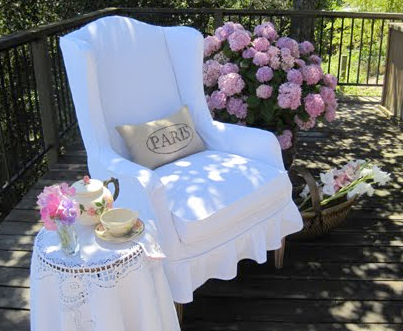
This summer has been incredibly busy with preparations for our daughter's wedding, the purchase of her and her fiancé's first home, visitors from around the world, business trip to Costa Rica and Honduras for Michael (even though he's officially retired) and ongoing work at the house.


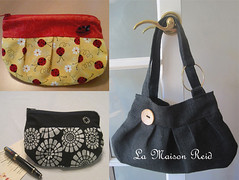
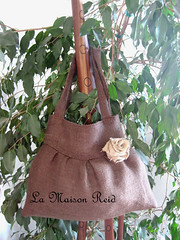
I have a another wing chair slipcover (and tutorial) almost finished but I just needed a break from that project. I saw a darling burlap purse online but it was $95!!!! Now, I can afford $95 for a purse but it was more of a challenge to see if I could make one as cute for a whole lot less than $95. I had just purchased chocolate brown burlap the day before beginning this project along with a darling pink chintz type print for lining. I was originally going to make another tote like the one I made here:

....but came up with something different:
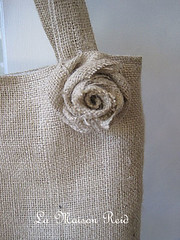
Chocolate Brown Burlap Purse with Shabby Rose Tutorial:
TERMS OF USE: This pattern is offered for free with the understanding that my readers will use it for personal use only. Please do not sell this pattern, bags made from this pattern, or bags made from modifications to this pattern (example: enlargements, wider/longer straps, etc.). If you make this purse and post about it, the design credit must be given to Nancy at La Maison Reid with a link to this pattern. I would like to say that I really appreciate the overwhelming support that I have received for putting this Burlap Bag with Shabby Rose out there for everyone to use. It’s immensely gratifying to receive such gracious emails from so many people who are using and enjoying it for themselves.

I made this bag for about $5.50. It was pretty easy to do. I started by cutting the bottom front and back. Cut two pieces 10" high x 18" wide. I made six pleats along the top, each pleat facing the center of the rectangle. After these were pinned in place I basted it on the sewing machine. Do this for both the front and back of the purse. Notice that the top is now curved. The piece that goes on top of this will need to be fitted.

Now measure the width of top (above the pleats) along the curve line with a soft tape measure. Mine measured 13" but this size will depend on how deep you make your pleats. Cut two pieces of burlap 5" tall x width of your top (5"x 13" for mine). Now...when I went to pin this piece on it appeared to be WAY too small. Don't freak out! Just follow the curve at the top and ease it into place. Sew these two pieces together. Now you can start on one side of the purse and sew down one side seam, the bottom seam and then up the other side seam in one swoop! Make your lining exactly like the outside and place it inside, wrong sides together.

I love this lining. Isn't it sweet? Before you sew the lining to the outside make your straps. I cut two strips 22"x3". Sew with 1/2" seam and turn inside out. Put these in between the lining and the outside and sew it all up. On this tote I put the straps side to side rather than front to back like I did in the first Burlap Tote (Tutorial). This is more of a "purse" while the first one I made is more like a "tote."

Now make a shabby rose! Easy to do and lots of good tutorials out there. Two of my favorite video tutorials are here:
Freckled Laundry
and
Crystelle Boutique
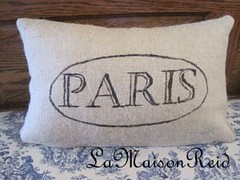
I made tiny shabby roses with grosgrain ribbon for this French Feedsack Style Pillow . They are so cute on so many different things.
Freckled Laundry
and
Crystelle Boutique
I made tiny shabby roses with grosgrain ribbon for this French Feedsack Style Pillow . They are so cute on so many different things.


Now that you can readily get colored burlap it will be fun to make unique and personal gifts. If you use this tutorial and make one for yourself, I'd love to see what you come up with. As usual, if you need any tips or advice or encouragement, I'd be happy to help. Just send me a note.
xox
Nancy
Follow up May 2, 2011
I'm still getting so many questions on how to make this purse so I thought I'd let you know that I've made some changes to and made it even better!
1) I added a magnetic snap. Many tutorials online on how to do this.
2) I added an inside pocket.
3) I made the straps wider and interfaced them as my first purse did not hold up very well without the extra fabric inside. After experimenting I learned that I had to turn the straps right side out after sewing them and THEN cut pelon/interfacing a tad narrower than the strap. I put a safety pin on one end of the interfacing and weave it through to the other end. This seemed to be the only way I could get interfacing in otherwise it was a mess trying to turn them inside right if the interfacing was already sewn in.
4) round the corners a bit so they're not so dog-eared. Follow this tutorial of mine about making better corners on pillows. There is a good photo of how to measure from the corners to get the rounded look:
http://lamaisonreid.blogspot.
only use these measurements:
measure 3 1/2" from the bottom corner up and 3 1/2" from bottom corner across the bottom. Make dots here. From the corner towards the middle mark 1" in towards the center and using those marks as a guide for curving the corners.
5) I also use iron on interfacing on the body to give it more shape. I'm much happier with these changes!
xox
Nancy


I love this purse!
ReplyDeleteRenee@reneebeads.com
OMGosh, this is an adorable purse and for only $5.50 Ÿ WOW! Thanks so much for the tut. I might try this if I get up the nerve to face my sewing machine after many many years of not touching it, lol.
ReplyDeleteThanks for the inspiration.
Wow - you are amazing. The purse is very pretty - and the cost!....
ReplyDeleteLove the brown purse, its so cute.
ReplyDeleteLove love love this purse. I'm going to have to give this a try. (I just happened upon you at Fireflies and Jellybeans. So glad I did!)
ReplyDeleteNancy this is too cute! I've never made a purse before, but you make it look so easy. I just might have to try it. Can't wait to see the slip you're working on,
ReplyDeleteKelly
Oh,isn't it just ADORABLE!!!!
ReplyDeleteYou have quite the way with burlap and the camera too! Those sunflowers are soooooooooo cute with he bag! Nice job! You are AMAZING, Nancy!
XOXO!!!
I love burlap and your purse is oh so sweet! This is my first visit and I have been enjoying reading your other posts, too. I'll be back!
ReplyDeleteHi there Nancy!
ReplyDeleteCongratulations on your daughter's wedding. she is such a lucky girl to be able to buy a house right away!
Hope you got to go to Costa Rica and Honduras with Michael!!!
I am so glad you like the tutorial about the burlap rose so much!
I posted about this story you wrote up on my potato burlap blog:
http://potatoboutique.blogspot.com/2010/08/another-wonderful-shbby-burlap-rose-on.html
Thanks for your enthusiasm!
Oh Nancy, it's so pretty. The dark brown gives it a special look. I was wondering what you were up to. I'm sure that wedding is keeping you plenty busy.
ReplyDeleteWhat a sweet little handbag! Love the touch of the rose, too -- very pretty.
ReplyDeletethanks for the instructions, too. You have a beautiful blog... Cass
Tat bag is really smart! Somehow I don't think mine would turn out quite so well, so I'll just admire yours~
ReplyDeleteThat bag is adorable. I was not blessed with a lot of sewing talent, just buying talent. I am going to try out your easy tutuorial. A friend makes purses and I am going to show her this(maybe she will make it for me)LOL
ReplyDeleteI would love one of these! Seriously, I am purse shopping and love this purse, however I do not sew at this moment. I will look around to see if I can find one for less than $95. Thanks for the tutorial. I will save it and maybe someday attempt this project!
ReplyDeleteHello! Just saw you at My Romantic Home. I love this tutorial! I think I'm going to give it a shot. So glad I found you, I'm a new follower. :o)
ReplyDeleteI LOVE this! Thanks for linking to FTF!
ReplyDeleteAdorable. I love it. Are you selling them? :)
ReplyDeleteI have a link party on Fridays...I'd love it if you'd join! alittleknickknack.blogspot.com
Such a wonderful purse! Full of quiet earthy funkiness. I love using burlap in unexpected places, and your purse is simply a divine use for it :-)
ReplyDeleteI liked the original bag, but I REALLY love this style, great job!!
ReplyDeleteLove this bag! Thanks for the tutorial!!!! I'm now a new follower!
ReplyDeleteWhat a great bag. I love purses and have some extra burlap laying around. I may just have to give this a go.
ReplyDeleteCome sign up for my giveaway at http://froufrugal.blogspot.com
Oh, I am making one tonight!! Thank so much for the tutorial....the purse is absolutely darling!!
ReplyDelete~Julia
This is adorable! I can never find soft enough burlap ... looks like a trip to the fabric mart is in order.
ReplyDeleteI LOVE IT! I'm definitely going to make one!
ReplyDeleteI love the purse! I have already made two burlap bags from your first tutorial. I love this one too. I will be trying it soon. I will post pictures of the first two and let people know how to find the tutorial. Thanks so much.
ReplyDeleteWhat an adorable purse! Just hopped over from Sherry's blog!
ReplyDeleteBeautiful!! I've never made a bag before, but this one looks like a good one to start with. Thanks for the tutorial!
ReplyDelete~ The Speckled Dog (craft-business book giveaway on my blog until 9/2)
Oh that is so pretty and so clever. I love it. Such a pretty linine too. It looks fabulous as a decoration too. Beautiful job. Thanks so much for linking to TTT. Hugs, Marty
ReplyDeleteThat is beautiful! I love it!
ReplyDeleteBeautiful!
ReplyDeleteSo cute! I'm visiting from TTL! Great blog! Come by Sassy Sites and say hi! :)
ReplyDeleteMarni @ Sassy Sites
www.sassysites.blogspot.com
MY blog is all about YOU!
I love your purse. It really is fabulous. The pattern is so pretty. Thank you so much for your nice comment on my blog and the "heads up." I have to admit, I wish bloggers would appropriately give credit where credit is due -- especially when someone puts a pattern out there for free! ;o) Thanks so much for your kind words. - Suzanne
ReplyDeletesuper cute purse thank you for sharing just found your blog i'm following hope you stop by mine and see my many tutorials as well
ReplyDeleteAmanda
http://patriciaraedesigns.blogspot.com/
Very lovely bag. I love the rose; it's so charming.
ReplyDeletethanks for linking up to TAke-A-Look Tuesday on Sugar Bee Craft Edition - you were featured today! Mandy, www.craftedition.blogspot.com
ReplyDeleteHow lovely!
ReplyDeleteIt's beautiful! I so wish I had the patience to sew.
ReplyDeleteI love this bag :)
ReplyDeleteLove the shape to this bag. You can do any fabric and any trim, but getting a good shape is the challenge. It looks wonderful. Found you over at Backyard Eden. Have a lovely weekend...even though we're only half-way through. (smile)
ReplyDeleteDawn @ BeatUntilFluffy.com
I really like the pleats on this bag. It lends such a nice shape, very feminine!!
ReplyDeleteVery cute indeed! :) Love the fabric you chose for the inside too. :)
ReplyDeleteThanks for linking up to Treasures and Trinkets Thursday, glad you stopped by!
Hugs
Missy
This turned out so cute! I really love it!
ReplyDeleteThis is gorgeous! How do you find time to do all this with wedding planning in full force, not to mention your visitors! Where did you find the burlap...was it in the city or local. I am so sad at the lack of fabric options i have here. You tickle me pink...come by tomorrow!
ReplyDeleteI love it! I love it so much in fact that I made one allready! Check out my blog, http://craftersanonymousclub.blogspot.com to see it. I linked to this post and to your blog. Thanks so much for the great tutorial!
ReplyDeleteI love your bag. You did a fantastic job. If only I could sew... It sounds like you are one busy lady. Keep on keeping on...
ReplyDeletePartying with you tonight. Stop by for a quick visit (if you have time).
Love it!! :)
ReplyDeleteyou are just a creative genius!! Seriously, you are quite talented! :) I am going to attempt one of these whenever I get a spare moment....(I keep waiting for the spare moment...;} ) love it ~ thanks so much for the awesome tutorial!
ReplyDeletexo,
Shellagh
Why pay $95 indeed! Especially when you have such mad sewing skills! That purse is absolutely stunning. You're inspiring me to get back up to my sewing machine again.
ReplyDeleteHave a great weekend!
Hi Nancy,
ReplyDeleteI LOVE, LOVE, LOVE your burlap purse!! I'm always amazed at what a talented sewer you are! Every creation I've seen you come up with is just beautiful!!
I only wish I knew how to sew (other than a button on a shirt ~ LOL), so I could use your terrific tutorial. :)
Have a great weekend!
Hugs ~ Jo
So cute! Is it scratchy on your arm when you carry it? Stopping by from Sew&Tell. Thanks for sharing. Happy Sewing! :o)
ReplyDeleteLarri at Seams Inspired
What a lovely purse. Well done!
ReplyDeleteHi Nancy!
ReplyDeleteI LOVE this bag...the shape of it is just PERFECT. I wish I was better with my sewing skills...but I didn't really get THAT gene... : )
Will you sell some of these?
Thanks for your sweet comment on my vin-tage girl sign. Yes, I used decoupage medium on it. I did age it with some paint glaze that I added some copper pigment and brown acrylic paint to. I'm just finishing another one today - cow-boy girl. With the kids back in school, I feel like I can really get some thigns accomplished.
What are of CA are you in? We moved from CA 2 years ago to WA. I was born and raised in the SF Bay Area.
Best,
Cori
Starview Sonnet
Beautiful bag and thanks for the tutorial too.
ReplyDeleteWonderful purse! I love those shabby roses!
ReplyDeletesuchakingdom.blogspot.com
Hi Nancy, The purse is gorgeous!! Your so talented.Thank you for all your sweet comments.The beadboard in the kitchen was really easy.If you have any questions about it let me know....Kathy
ReplyDeleteYour pursed turned out beautifully.
ReplyDeleteHi Nancy~ just stopped by from Treasures and Trinkets Thursday~ I love your charming project! Thanks so much for the tutorial~ I am a new follower!
ReplyDeleteHow beautiful! Thanks for the tutorial! Dropping by from Flaunt It Friday =)
ReplyDeleteSuch a great idea and so cute! Thanks!
ReplyDeletei loved your last purse but this one is too cute as well. I finally had my first project on my sewing machine today so I feel like I can now ;)
ReplyDeleteLove this adorable purse! Thanks for the tute!
ReplyDeletegorgeous!!! Cheri at 'I Am Momma Hear Me Roar' made a leather bag - you might want to check it out!
ReplyDeletehttp://iammommahearmeroar.blogspot.com/2010/08/leather-purse.html
After seeing all these bag tutorials... I am liking the idea of making my own. Thanks for sharing :)
Very cute bag! Thanks for joining my party..hope to see you again sometime.
ReplyDeletethis is so pretty, i love it
ReplyDeleteAdorable bag! I don't sew anymore..but it sure is cute for Fall!!
ReplyDeleteThe tears...no..they did NOT work!! The WAR rages on I'm afraid.
I feel like the pilot of the Anola Gay over Hiroshima, I swear. They grab their eggs and run for it...and I ...I...I blast away! I'm beginning to feel a bit guilty...but now enough. Not enough...
So tomorrow morning early, just at dawn...another siege!!!
Nancy, Simply gorgeous! Another fabulous project - your talent amazes me! I have featured this - stop by and grab a featured button if you like. Hope you are enjoying your weekend! Thanks for linking to The Sunday Showcase. ~ Stephanie Lynn
ReplyDeletehttp://www.bystephanielynn.com/2010/08/three-scoops-of-love-giveaway-reminder.html
LOVE THIS!!! How cute and stylish!
ReplyDeleteVery cute, but is it itchy? Or does the burlap shed? I would make it but I'm afraid I would be wearing all the little fuzzy pieces from the burlap all day.
ReplyDeletesofabellie...send me your email..I just wrote you a whole page email only to find your return address was "noreply-comment@blogger.com" which reminds me of a recent post by Meridian Rd
ReplyDeletehttp://meridianroad.blogspot.com/2010/08/my-nemesis.html
She wrote a post about how frustrating it is to be asked a question and not having any way to respond!
xox
Nancy
You are incredibly talented!! Love the bags!
ReplyDeleteLisa
Cute cute cute!!!! Love it! And the tote, too! Makes me wish that I could sew......hmmmmm....maybe I'll have to enlist my sis to whip one up for me. lol!
ReplyDeletexoxo laurie@heavens-walk
Love it! We are so glad you joined us for Anything Related! Come back tomorrow for another great party!
ReplyDeleteThis is just the neatest bag I have ever seen. I love it. Such a great idea and what a super tutorial. Love it. Thanks so much for linking to TTT. Hugs, Marty
ReplyDeleteBurlap and roses - one of my favorite combinations.
ReplyDeleteHello!
ReplyDeleteI am new to your blog, but I just love this little bag! VERY CUTE! Thanks for sharing!
~Liz
too adorably cute!!
ReplyDeletethanks for the tutorial
came over form all thingz related.
blessings
barbara jean
PS would like to tell others about you.
Oh my gosh that is too cute! I love it. I don't know if I'm brave enough to try the pleat. I'm working on one of my first sewing projects right now and it's a burlap bag too. I ♥ this one though and will have to try it soon.
ReplyDeleteposted these on my blog for tomorrow
ReplyDeletehope to make some soon. love en!!
blessings
barbara jean
Love the purse. The rose adds such a sweet touch to it.
ReplyDeleteWhy does it always take me forever to find fabulous things? But Oh well, I did find your fabulous purse! I just love it and I need a gift for a friend. So after I make one for myself I will make one for her. Well, I have to try it out for me first to see if I make it come out befitting giftgiving. LOL
ReplyDeleteCan't wait to try this!
I love the tutorial. I would love to try this. you are so smart. Beautiful
ReplyDeleteI just adore this bag...and a perfect tutorial. Thank you so much for linking up to air your Laundry Friday!
ReplyDeleteHugs,
Jami
I just made this in corduroy and it is fantastic!!!
ReplyDeleteI just saw this today and featured it on my blog. Super sweet design and thanks SO much for adding the tutorial! -diane
ReplyDeleteHi,
ReplyDeleteI do not have much experience sewing, but I decided to try and make this purse. The burlap portion of the bag turned out really well, but now I am trying to sew the lining to the burlap. I know this should probably be super easy, but I don't know how to sew it around the top so that it looks nice and straight. Is this something that just takes practice, or is there a trick to make it easier? Any tips would be appreciated. Thanks, Ashley
Hi Ashley,
ReplyDeleteI just wrote you a whole huge email replying to your questions. I even took five photos and resized them to send to you but when I hit "send" I realized I had
Ashley at “noreply-comment at blogger.com”
as your return email address. Send me your email address (nancyareid@gmail.com) and I'll send the email.
I really had fun with your purse pattern this Christmas. I made the pattern a little smaller and made a purse for my grand-daughter and one of my neighbors daughter. Than I made 5 for family and friends. I also made the pattern and made my daughter a diaper bag. She is due in 2011. It was so fun to make home-made Christmas gifts this year. Oh yes I did make one for myself.
ReplyDeleteBeautiful purse!
ReplyDeleteI somehow came across this and I am so happy I did. I was looking at my purse this morning that has a similar design and I thought... I wonder if I can make this. Thanks for the fabulous tutorial.
I LOVE this purse! It is super adorable!
ReplyDeleteI loved it so much, I featured it on my blog today!
You can check out the post here:
http://justbeckause.blogspot.com/2011/02/blog-head-monday.html
Have a great day!
<3 Becky
justbeckause.blogspot.com
This pattern would be so PERFECT for several different colors and seasons of bags! I love it! Could you send me the pattern? Many thanks!
ReplyDeleteVicky...do you have an email address?
ReplyDeleteReally good eco friendly blog thanks for sharing fantastic designs of about the Burlap bags.
ReplyDeleteThanks for sharing the information about the Burlap bags.By using these type of bags we can save from pollution.
ReplyDeletehttp://www.jutetapes.com
Good blog in sharing the information about the burlap bags and shopping bags.
ReplyDeletehttp://www.jutegoods.com
I absolutely love this purse and would love to give it a go. Is there anyway you could send me the pattern for this. Also is there any hints that you could give when it comes to sewing the pleats. I am actually new to the sewing world and would love any hints. That would be great.
ReplyDeleteThanks!
P.S. My email address is cutecntrycowgrl@aol.com
Hiya, I think this purse looks great and would love to take a wack at it :-) ... So could you pls send me the patter .. Email rantismalls@hotmail.com ..
ReplyDeleteThanks Much...
My daughter and I tried your tutorial this weekend for the brown burlap bag. They turned out great! Thanks so much for the free tutorial and the shabby chic rose link. Pictures posted here: http://justdebbiedeb.blogspot.com/2011/06/handmade-handbags.html
ReplyDeleteThanks so much! emmapaige.blogspot.com
ReplyDeleteposted more pics :) thanks again!
ReplyDeleteI love this! I am going to make one when I come home from visiting my dentist today! The tutorial is great. I plan to check out more of your ideas.This one is a classic.
ReplyDeleteFirst time on your blog but not my last! My 12 year old grand daughter wants to learn to design and sew things and I thought this would be a great place to start with such a cute pattern to make!! I love the purse myself! Thank you for sharing this!
ReplyDeleteI would have never thought that I could fall in love with a handbag made out of burlap, but I truly love this bag. The color is perfect and would go with so many things.
ReplyDeleteWhen adding the interfacing to the bag, to you sew it on the wrong side of the outside fabric, and then put the lining in as usual? Or do you make a 'sandwich" of the outside, interfacing, lining, and then sew them all together? Can't wait to make this!!
ReplyDeleteI sent you a reply but it was returned (Emma so if you send me an email located under my profile I will send it to you answering your question. I was in China and "blogspot" is blocked there so I couldn't reply sooner!
ReplyDeletexox
Nancy
Oh my Goodness!!! Love this purse and have burlap from another project and it will do just fine. Lots of pretty patterned lining choices also. Excited! Rainy day and now I know how to spend this Saturday. Looking forward to finding other lovely projects on your site. Thank you, Miss Harrie
ReplyDeleteLove this and to share the directions is so nice of you. Donna
ReplyDeleteold2new-junktique.blogspot.com
That's one classy bag!!! I love the shape. The flower co-ordinates beautifully with the brown burlap. (We call it hessian in Australia.) I would love for you to share this (and any other bags) at my ongoing linky that's exclusively for bags and totes...
ReplyDeletehttp://threadingmyway.blogspot.com/2012/01/threading-your-way-bags-and-totes-link.html
Thanks for linking up...
DeleteYour roses are the most beautiful ever!
ReplyDeleteyours are better than the tutorials ^^)
Thank you for sharing the burlap bag tutorial! Love it.
ReplyDeleteThank you so much for sharing. Well appreciated. Love the bag. Great post! popular purses
ReplyDeleteThank you for this pattern. I made a couple changes, I cut a empty water jug to the shape of the bottom, put in a pocket, and used cane handles. I also used left over upholstery fabric. I love it. Now I have to make more for the rest of my daughters. I did see some great purple burlap at the store the other day.
ReplyDeleteI love it! Also the zippered bags. What great ideas. They are so cute. Thank you for sharing.
ReplyDeleteThank you! I have been looking for a SIMPLE tutorial on how to make a bag and I think I finally found it!!!! Love this!
ReplyDeleteI see a Purse that I could enjoy making, and using. My e-mail address is willa.morris@yahoo.com Sure would appreciate the pattern. I've been sewing quite a while, like maybe 75 years, and still find it a exciting thing to do. Love to create beautiful things to use and give. Thanks so very much! WM
ReplyDeleteI love the purse! Would you send me the pattern and tips for attaching the lining? My email address is 1kb@msn.com. Thanks, Karen
ReplyDeleteI see a Purse that I could enjoy making, and using. My e-mail address is willa.morris@yahoo.com Sure would appreciate the pattern. I've been sewing quite a while, like maybe 75 years, and still find it a exciting thing to do. Love to create beautiful things to use and give. Thanks so very much! WM
ReplyDeleteThanks for such a great tutorial. I totally fell in love with the bag! So I made it! Yay! Anyway it turned out great. It was a little bit scratchy so what did I do? I threw it in the washing machine!!!! Fail! Needless to say I will be redoing the outer shell. Although my straps held up really well. Do you have any tips on keeping burlap from fraying? I won't wash the next one! :)
ReplyDeleteHi Jessica,
DeleteI love that bag, too, and have just about worn mine out and need to make another one. I got so many compliments on it all over the world.
Make sure you read the follow up at the bottom of the post on this bag. I made some changes with the next bags I made including interfacing the straps. Even with the interfacing my straps on other bags are wearing out from too much use. I use iron on interfacing on all my bags now and iron them with a really hot iron on the burlap side which seems to make it less scratchy. Really iron it A LOT!!!! It seems to get softer with use, too. As for fraying, I do topstitch the edges before sewing the seams together. All in all, I would say these are not everyday bags. Too fragile.
I'd love to see what you make. I have a list of people who have made it and love seeing their photos. Someday I may write a post about what everyone came up with.
My favorite burlap bag is the black one below. Too bad I gave it away! Also made a white one with yellow print lining that needs new straps!
http://lamaisonreid.blogspot.com/2011/01/pleated-pouch-presents.html
http://lamaisonreid.blogspot.com/2010/11/burlap-bag-and-thank-you.html
Keep up the good work....hope you get this response...your email address was not included in your post!
xox
Nancy
Hi I love your ideas But, where do we buy Burlap material in NZ
ReplyDeleteHi Louise,
DeleteIn New Zealand burlap is called hessian! I believe I have seen it in Manukau at David's Emporium, Stock House Fabrics and as I remember the best selection was at wholesale place I just love called Designer Textiles International (11 Lovegrove Cr Otara). I could spend all day there. If you're not close to Auckland just ask your local fabric shop for hessian.
Good luck!
xox
Nancy
Hi Nancy,
ReplyDeleteI saw your bag design on allfreesewing, and have made two. I absolutely love them. I made the first one out of an old denim jumper, and the second one out of a burlap-looking (not scratchy) pink material from some pants that used to belong to my mother. I'd be happy to send you pictures if you tell me where to send them.
I solved the problem of sewing in the lining by sewing the lining and outside of the bag (right sides together) across the top first (position the handles first), then opening them up and sewing the two pieces together right sides together leaving an opening in the lining and then pulling the the bag right side out through the hole. Push the lining into place. I ironed the top and then top-stitching was a breeze. I added a button and button-hole (new skill) to the first and magnetic purse snaps to the second.
I was wondering if you would sell me a copy of this pattern so that I could make these to sell? (I actually made a pattern - big foldable rectangle with pleat marks noted - so would just need your permission.)
You have an incredible blog. Thank you for posting this tutorial. judy.pece@gmail.com
Just made this as a treat for myself after finishing Halloween costumes for the kids. It was the perfect use of some of my stash FQs!
ReplyDeleteI've been wanting a red purse, but since 'Plan A' for me and purses is usually buying purses at thrift shops - I think I'm out of luck for 'plan A', because there's not a high likelihood of finding a red purse that is cute at all (they won't last long enough for me to find them). So it finally dawned on me to look online for a pattern and get inspired enough to go purchase some fabric - and make my own red purse. This is it! There is red burlap at the fabric store down the street. Now a bit of it has my name on it, along with enough natural colored burlap for a sweet little rose. All that's left to select is the lining. Certainly that won't be too hard. This is going to be fun! Thanks so much for sharing your lovely work! What an inspiration!
ReplyDeleteThis is perfect for fall! I'd love it if you'd share this at my linky party! http://www.accidentallywonderful.blogspot.com
ReplyDeleteI see its been awhile since this was posted-but it is soo cute. I too would love the pattern please. savedangel803@yahoo.com
ReplyDeleteYou seem to have a busy adventurous life :-) so I understand if you're busy.
Thank you much!
A.E.
I just happened across a link to the adorable purse! And Fabric Depot just happens to have some gorgeous burlap on sale! I will certainly give you the design credit and link when I post about this on my blog. Thanks for sharing!
ReplyDeleteIs it too late to ask you to email a pattern to me? I love the purse and want to give it a try? Thank you, Deb halstead@pcpartner.net
ReplyDeleteFrom the anonymous previous post.....my email is halstead@pcpartner.net
ReplyDeleteJust made this purse while watching over my croupy baby, definitely made being up late that little bit easier. It's gorgeous btw, thank you for sharing!
ReplyDeleteI just came across this adorable purse. Is there any tricks to sewing with burlap, is it real scratchy? Also can you email m the pattern. Your purse is fabulous. email is
ReplyDeletevkwright@comcast.net
A big THANK YOU for this great tutorial! I just made one for a friend's birthday. I wanted to email my pix to you but I can't seem to be able to access it?
ReplyDeleteHi Tp Choo,
DeleteSo glad you liked my tutorial. I would love to see a picture of what you made. Nancyareid@gmail.com
there are a few of anonymous emails that should be deleted from your site. rude
ReplyDeleteI do love the bag tho. going to try it this week
Thank you for this pattern. I made it for a friend and it turned out really nice.
ReplyDeleteI love this pattern! Really easy! I have a suggestion about making the handles. Use iron on interfacing. Then instead of sewing the handles and turning them, turn each side under 1/2" pin and topstitch. I also topstitch the other side. I find this much easier than turning the handles.
ReplyDeleteIs it feasible to put a gusset strip in the base so the purse will kind of "sit" up rather than fall over when it it set down?
ReplyDeleteIn the oblong burlap purse I made I made a gusset and lined it with a heavy pelon...yes...you could do it with this purse, too!
DeleteThis comment has been removed by a blog administrator.
ReplyDelete